
Why Driveway Gate Pillars Present Unique Structural Challenges
Mounting a lightweight plaque onto flat interior drywall takes five minutes; anchoring a 12-pound sand-cast bronze or carved Welsh slate marker onto outdoor masonry gate pillars requires proper masonry engineering. Gate columns sit fully exposed to wind-driven rain, freeze-thaw moisture cycles, irrigation overspray, and mechanical vibration every time heavy wrought-iron swing gates latch shut.
Even worse, modern residential columns are rarely solid brick all the way through—most consist of 1.25-inch natural or cultured split-face stone veneer mortared over an 8-inch concrete masonry unit (CMU) core. Driving plastic conical wall plugs or zinc lag shields near mortar edges cracks brittle veneer stones and allows rust-streaked rainwater to bleed down the column face.
1. Sightline Elevation & Setback Sizing at the Apron
Before drilling a single pilot hole in irreversible stonework, verify two geometric clearances from the driver's seat of an approaching vehicle:
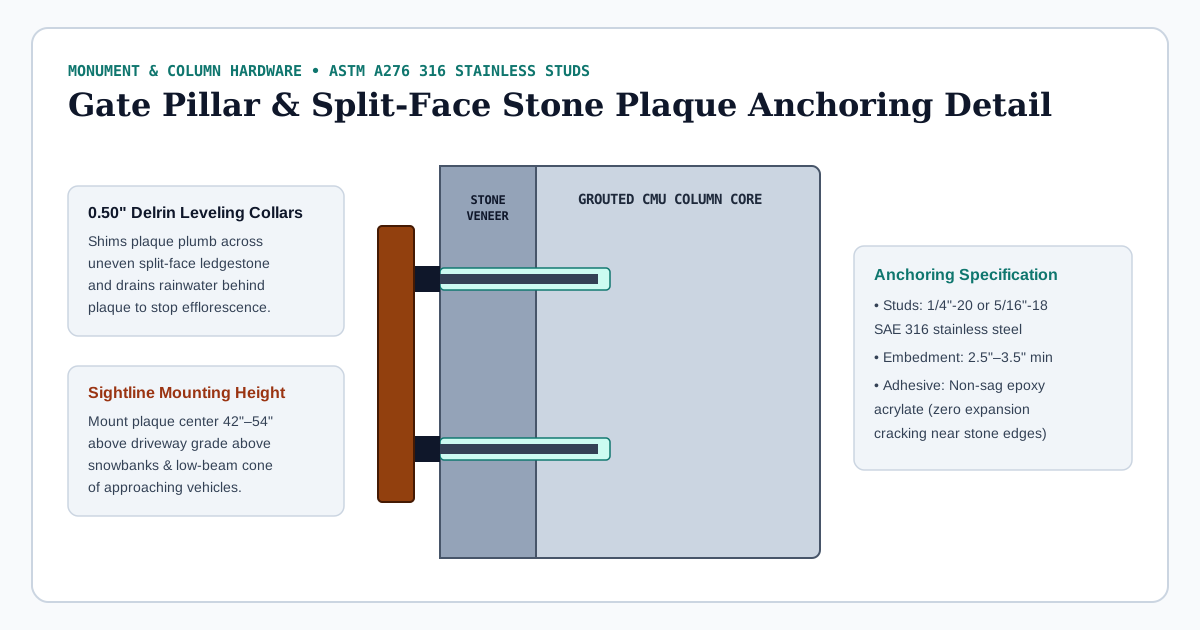
- Centerline Elevation (42 to 54 Inches Above Grade): Placing a plaque below 30 inches buries it behind winter snowbanks, perennial landscaping, and splashback mud; mounting it above 68 inches on a tall pier lifts it out of low-beam headlight cones at night. Positioning the plaque center between 42 and 54 inches aligns squarely with both sedan and fire-engine cab sightlines.
- Approach Angle & Numeral Height: When gate pillars sit 25 to 45 feet off the travel lane inside a curved apron, size primary numerals to at least 4.5 to 6.0 inches—referencing the complete IFC §505.1 fire-code setback height chart so approaching crews can read the address before passing the turnoff.
- Pre-Wiring Low-Voltage Conduit: If the column also carries keypad intercom conduit or landscape lighting, check voltage-drop wire gauge requirements in this 12V and 24V DC Class 2 LED address wiring guide before core-drilling the pier cap.
2. Bridging Uneven Split-Face Stone Without Cracking the Plaque
Split-face ledgestone, cobble fieldstone, and rugged limestone ashlar often vary by 3/8 inch to 1 full inch in surface relief across a 16-inch span. If you tighten through-bolts directly against high spots with a hollow cavity behind the center of a carved slate plaque, tensile bending stress can snap the stone slab cleanly in half.
- Concealed Blind-Boss Studs + Delrin Stand-Off Collars: Thread 3.5-inch to 4.5-inch 316 stainless studs (
1/4"-20or5/16"-18) into the rear blind bosses of the plaque. Slide UV-stabilized black Delrin (acetal) or brushed stainless spacer sleeves onto each stud, trimming sleeve lengths individually so all four standoffs kiss the irregular stone face simultaneously while holding the plaque plumb 0.38 to 0.50 inches proud of the highest stone peak. - Drainage & Efflorescence Prevention: That 0.50-inch air gap behind the plaque allows rainwater and dissolved mortar salts (efflorescence) to sheet freely down the stone behind the sign rather than ponding along the top edge and staining the face.
- Recessed Mortar-Pocket Flush Option: On newly laid stone columns, masons frequently set a 1-inch-thick bluestone or cast-stone "plaque receiving block" flush into the veneer course during construction, creating a dead-flat framed architectural niche.
3. Step-by-Step Non-Expanding Epoxy Anchoring Protocol
Never use wedge expansion bolts on narrow brick headers or thin stone veneers—radial expansion pressure splits stone along natural cleavage planes. Instead, anchor passively using two-part structural epoxy:
| Installation Step | Tool / Material Spec | Critical Field Quality Check |
|---|---|---|
| 1. Template Leveling | 1:1 kraft drilling template + torpedo level | Level to true horizon—never trust sloped mortar joints |
| 2. Rotary-Only Pilot Bore | Diamond grit core bit (granite/river rock) or carbide masonry bit, 1/8" oversize | Disable hammer percussion for the first 1 inch through brittle veneer face |
| 3. Bore Cleaning | Nylon bottle brush + compressed air bulb | Blow out 100% of rock flour—dust cuts epoxy bond strength by 60%+ |
| 4. Epoxy Injection | ASTM C881 non-sag epoxy acrylate (e.g., Simpson SET-3G / Hilti HIT-HY) + mesh screen tube if hollow CMU | Fill bore from bottom outward to eliminate trapped air pockets; brace 45 min until gel cure |
4. Sealing Dissimilar Metals Against Galvanic & Acidic Corrosion
Two final details separate 30-year monument installations from premature stains: first, never mix plain zinc-plated all-thread rod with bronze or aluminum plaques—wet alkaline mortar dissolves zinc plating in months and initiates galvanic corrosion; always verify non-magnetic molybdenum-stabilized 316 stainless studs. Second, if applying a perimeter weather bead on smooth brick or stucco, use neutral-cure oxime architectural silicone rather than household acetoxy silicone, whose acetic acid vapor tarnishes copper-bearing bronze alloys.
5. Freestanding Lawn & Boulder Alternatives When Gate Piers Are Obstructed
On wooded rural estates where Mature hedges, iron gate leaves, or deep stone wing walls block sightlines to the main column, supplement or relocate the marker onto a dedicated dual-post architectural lawn monument set 6 to 10 feet forward of the gate swing arc. Extruded 2 × 2 inch heavy-wall aluminum stakes driven 24 inches below frost-heave turf—or stainless pins epoxied into a natural granite landscape boulder—place a 45-degree angled custom plaque squarely in approaching headlights from both road directions without drilling historic stonework.
Planning a custom bronze or carved slate marker for split-face stone piers? Calculate your ideal plaque width and cap-heights in our Two-Line Dimension Calculator or email pier photos to info@customaddresssigns.com.
Ready to Preview Your Custom Two-Line Plaque?
Test silhouettes, bronze vs. slate finishes, and kerning proportions in our Live Custom Plaque Composer or email your project specs to info@customaddresssigns.com.